

Learn how to start seeds indoors to get a jump on the season and to grow your starter plants at a fraction of what they cost at the nurseries.
Remember in elementary school when your class nurtured bean plants inside Dixie cups by the window? I can recall the thrill of seeing a little green sprout push through the dirt in my cup after what seemed like a lifetime of planting patience.
That same excitement still surfaces every March, when the days of Spring begin to tease my green thumb from its hibernation. And just like that anxious fourth-grade gardener, I can hardly wait to get going on my growing.
Starting Seeds Indoors Saves Money and Space
Luckily, there’s plenty to be done while the last of winter’s frost lingers. Seeds offer a wide variety of colors, sizes, and growth habits at a fraction of the cost of nursery started plants. So get a jump on the season by coaxing seedlings into sprouts indoors. Just like those tiny cups on the classroom sill, a seed-starting setup doesn’t take up a lot of space. So even those limited to apartments, condos, and bitty balconies can dig in.
Here, I’ve sowed several tips for sprouting seeds in small spaces.
A South Facing Window
When you start seeds indoors with natural sunlight always place them in a south-facing window.
Install one or two glass shelves in the window frame. You can also stack cabinet organizers on top of the sill or on an adjacent table. If your window is subject to drafts (as many are in older urban buildings), consider situating an electric heating mat underneath your window plot.
You can even string recycled coffee k-cups, plastic soda bottles, ziptop bags, or plastic trading card sleeves vertically between window frames. These makeshift planters are the perfect size to hold enough potting mix and a single seed in each compartment.
Go Vertical On a Sunny Wall
Sometimes it’s best to think outside the box when you start seeds indoors. You can hang a clear plastic shoe organizer on the wall (like this one), and then poke holes in the bottom of every pouch except those on the lowest row. Plant individual seedlings in each section. Water the top row, then watch the water trickle the top down to the bottom.
There are many vertical wall growing systems on the market, such as these modular, magnetic arrangements or larger fabric planting pockets like these.
Start Seeds In a Cold Frame
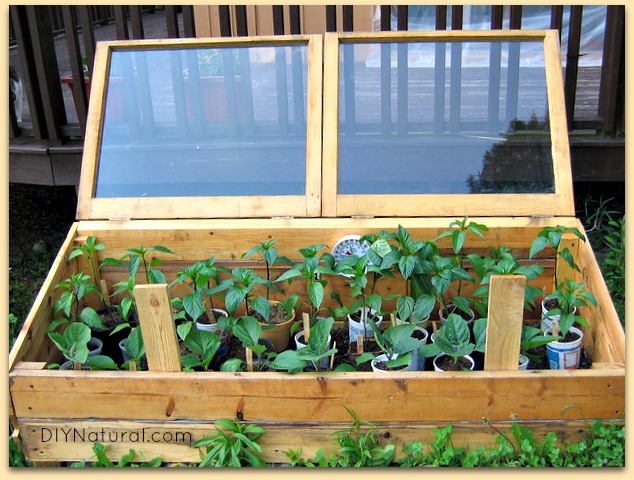
Create a ‘cold frame’ using a clear plastic bin or a wooden box with a hinged window top. You want the plants to be able to get regular air. By allowing your plants’ fresh air they grow and acclimate to the wind and cold. Just remember to close the lid at night to protect your seedlings from freezing temperatures.
Start Seeds Indoors With a Grow Light
One of the easiest ways to start seeds indoors is by purchasing a grow light. This provides the illumination seeds need when natural sunlight is lacking. Most of these lights have been outfitted with chains meant for suspension from the ceiling, but to keep your seed-starting footprint to a minimum, try hanging the light beneath a shelf or coffee table. Seedlings can then be tucked beneath this furniture without detracting from its functionality.
How to Start Seeds Indoors
Start with the right seeds!
Start Non-GMO Seeds Indoors
Rather than getting hybrid seeds at your local big box nursery, we highly recommend getting non-GMO seeds from a reputable source. Healthy seeds grow healthy plants that make healthy people.
- Find vegetable seeds here.
- Find herb seeds here. Also, find herb seeds here.
- Find flower seeds here.
1. Starting Seeds Indoors: Soil Prep
Seeds need nutrients right off the bat. But, not a lot at one time. A good soil combination is key. I use the following mix, although you can vary it however you want:
- 1 part soil – this can be the existing soil, commercial topsoil, or other bagged mix
- 1 part compost – it can be your own or a bagged mix like mushroom compost
- optional – slow release fertilizer, perlite, or vermiculite
- 1 part pine bark mulch – this helps keep the soil moist without saturating it, helps with drainage and in keeping the pH at the right level.
- coffee grounds – amount depends on how much soil you make (When I use bagged mixes, I use about 2 cups of coffee grounds per bag of mix. This helps provide nitrogen and other nutrients.)
Mix all of these thoroughly. I use a cement mixing tray which holds a bit over 5 gallons. I can really get in there and mix it well while not losing any of it over the sides of the mixing trough. You’ll also want to dampen the soil, but not to the point at which it’s dripping.
2. Starting Seeds Indoors: Prep Bedding Flats
Prepare Seed Starter Pots
You can purchase seed starter pots online here or in most garden centers, but why not try something new? Eggshells, citrus rinds, and even toilet paper tubes work very well for plant starters.
This is a good time to put those used K Cups to work. Take the top off, dump the coffee grounds into a bucket and clean the cup well, but don’t remove the filter inside. This will hold onto your soil.
I also save the containers from when I purchase rotisserie chickens and use them when starting seeds indoors. The plastic used is one that is known to not leach toxins into the soil, and the top acts like a greenhouse.
Paper cups or any other biodegradable material is option number one. Consider transforming biodegradable egg cartons or eggshell halves, homemade newspaper pots, or plastic clamshells from store-bought greens into petite planters. You’ll want to place a single seedling in each container or space them out a great deal so that their roots won’t tangle together.
Clean all of your potting containers thoroughly. Disinfect and rinse them well. Allow them to air dry to be sure there is nothing lingering that could hurt the plants.
Arrange Bedding Flats
Once your containers for starting seeds indoors are clean and dry, place them in bedding flats. These are usually square or rectangular containers that look like the cardboard flat that soda cases come in. Some have holes and some don’t. I use the ones without holes as I want to retain some moisture. Line everything up so you can fit as many as possible.
Fill Starter Pots
When starting seeds indoors you want small, sifted soil. So sift your soil to get as much of the bigger stuff out as you can, and only use the smaller stuff. I separate out the bigger clumps and sticks and use them for bigger pots.
Place a small amount of soil in the bottom of each container and water well. A turkey baster works great for this. Then add more soil to the top. Poke your finger in the middle to leave a hole for the seeds. Water well again. Place the seeds in the hole and cover lightly with soil. The general rule of thumb is to plant no deeper than 3 times the width of the seed.
Sprinkle a bit of cinnamon on top of the soil. Cinnamon is an anti-fungal that can help keep soil fungus at bay. (Soil fungus is the cause of die-off in a lot of seedlings.) Spray the top of the soil lightly with water and set it in a sunny location.
3. Caring For Your Seedlings
Water Regularly
Keep watering the seedlings daily, just enough to dampen the soil. As the seeds sprout, you can remove any cover that you have. Remember, a sunny window is preferable but you can substitute a grow light if necessary. Most newer windows are UV coated, blocking out the UV rays that plants need to survive, so you may need to open the window or place them outside during the day. Be careful not to burn them as the sun’s rays can be very strong for delicate seedlings.
Acclimate Your Sprouts
When the seedlings are ready to go outside, roughly two weeks before transplanting, begin “hardening them off” by introducing them to the elements. Start by placing them in the shade on warm afternoons for two to three hours, and then gradually move them into the sun while also increasing their alfresco time. Keep in mind timing is different for each plant. If the weather is freezing at night, bring them in and start again the next day.
Transplant Outside
When you start seeds indoors your seedlings will sprout and establish leaves. Once this happens, and the threat of frost has passed, it’s time to move them outside for good. If using a biodegradable planter (such as an egg carton) then transfer each seedling container directly into the ground. Simply cut it to divide the compartments and plant. If your planters are not biodegradable, gently remove the sprout from its nest, and plant it into moist, fertile soil.
Fertilize Your Started Seeds
Fertilize plants once they are in the ground. I use a worm compost tea that I get by running some water through my worm bed. This is really rich in nutrients. You can do the same with compost tea. If you use commercial fertilizer, remember to cut it back by half. As Master Gardeners, we learned the term “weakly, weekly.” This meant using weak fertilizer but fertilizing more often. If you don’t use fertilizer, that’s fine, but you’ll still want to keep them well watered until they are established.
Now that you know how to start seeds indoors go get your seeds and start on your garden plans!
*******
How To Start Seeds Indoors: And Tips for Starting Your Garden Inside was written by Guest Author.